For this month's October Daring Baker's Challenge, the task was to make your own pizza dough, and TOSS it. The actual challenge is immortalising the "toss" for all to see. This month's challenge was hosted by Rosa's Yummy Yums. Sadly, one of the other persons who was supposed to co-host passed away.
This was the recipe, which I am abridging, for the instructions were as long as the Old Testament. I have also omitted the Gluten Free options, since I didn't use any of them.
BASIC PIZZA DOUGH ~
Original recipe taken from “The Bread Baker’s Apprentice” by Peter Reinhart.
Makes 6 pizza crusts (about 9-12 inches/23-30 cm in diameter).
Ingredients:
4 1/2 Cups (20 1/4 ounces/607.5 g) Unbleached high-gluten (%14) bread flour or all purpose flour, chilled
1 3/4 Tsp Salt
1 Tsp Instant yeast
1/4 Cup (2 ounces/60g) Olive oil or vegetable oil (both optional, but it’s better with)
1 3/4 Cups (14 ounces/420g or 420ml) Water, ice cold (40° F/4.5° C)
1 Tb sugar
Semolina/durum flour or cornmeal for dusting
DAY ONE
(I shuddered when I saw "DAY ONE", cos gasp, that meant needing (kneading) more than 1 day, which is 23 hours too much for me)
Method:
1. Mix together the flour, salt and instant yeast in a big bowl (or in the bowl of your stand mixer).
2. Add the oil, sugar and cold water and mix well (with the help of a large wooden spoon or with the paddle attachment, on low speed) in order to form a sticky ball of dough. On a clean surface, knead for about 5-7 minutes, until the dough is smooth and the ingredients are homogeneously distributed. If it is too wet, add a little flour (not too much, though) and if it is too dry add 1 or 2 teaspoons extra water.
[I just plonked my dough into the Magimix Food Processor using the dough hook attachment. Works like a dream]
3. Flour a work surface or counter. Line a jelly pan with baking paper/parchment. Lightly oil the paper.
4. With the help of a metal or plastic dough scraper, cut the dough into 6 equal pieces (or larger if you want to make larger pizzas).
5. Sprinkle some flour over the dough. Make sure your hands are dry and then flour them. Gently round each piece into a ball.
NOTE: If the dough sticks to your hands, then dip your hands into the flour again.
6. Transfer the dough balls to the lined jelly pan and mist them generously with spray oil. Slip the pan into plastic bag or enclose in plastic food wrap.
7. Put the pan into the refrigerator and let the dough rest overnight or for up to thee days.
[I was surprised to see that the dough actually proofs in the fridge. I always thought Yeast required a warm place to work]
NOTE: You can store the dough balls in a zippered freezer bag if you want to save some of the dough for any future baking. In that case, pour some oil(a few tablespooons only) in a medium bowl and dip each dough ball into the oil, so that it is completely covered in oil. Then put each ball into a separate bag. Store the bags in the freezer for no longer than 3 months. The day before you plan to make pizza, remember to transfer the dough balls from the freezer to the refrigerator.
DAY TWO
8. On the day you plan to eat pizza, exactly 2 hours before you make it (again, I dread these kind of precision timing), remove the desired number of dough balls from the refrigerator. Dust the counter with flour and spray lightly with oil. Place the dough balls on a floured surface and sprinkle them with flour. Dust your hands with flour and delicately press the dough into disks about 1/2 inch/1.3 cm thick and 5 inches/12.7 cm in diameter. Sprinkle with flour and mist with oil. Loosely cover the dough rounds with plastic wrap and then allow to rest for 2 hours. (this recipe obviously does not cater to working people, who come home from work and need to eat pizza immediately)
At least 45 minutes before making the pizza, place a baking stone on the lower third of the oven. Preheat the oven as hot as possible (500° F/260° C).
NOTE: If you do not have a baking stone, then use the back of a jelly pan. Do not preheat the pan.
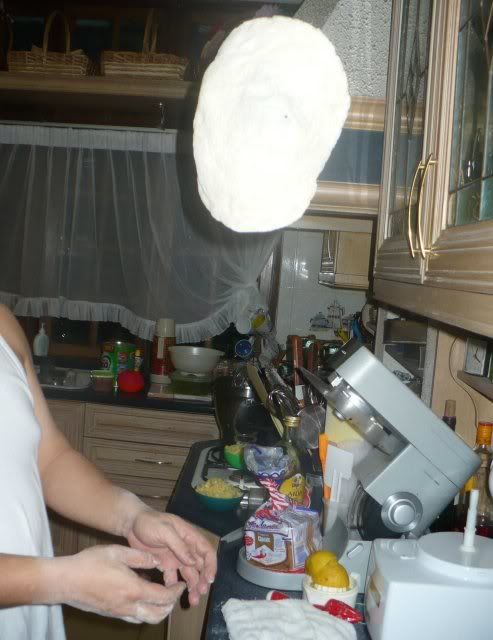
9. Generously sprinkle the back of a jelly pan with semolina/durum flour or cornmeal. Flour your hands (palms, backs and knuckles). Take 1 piece of dough by lifting it with a pastry scraper. Lay the dough across your fists in a very delicate way and carefully stretch it by bouncing it in a circular motion on your hands, and by giving it a little stretch with each bounce. Once the dough has expanded outward, move to a full toss.
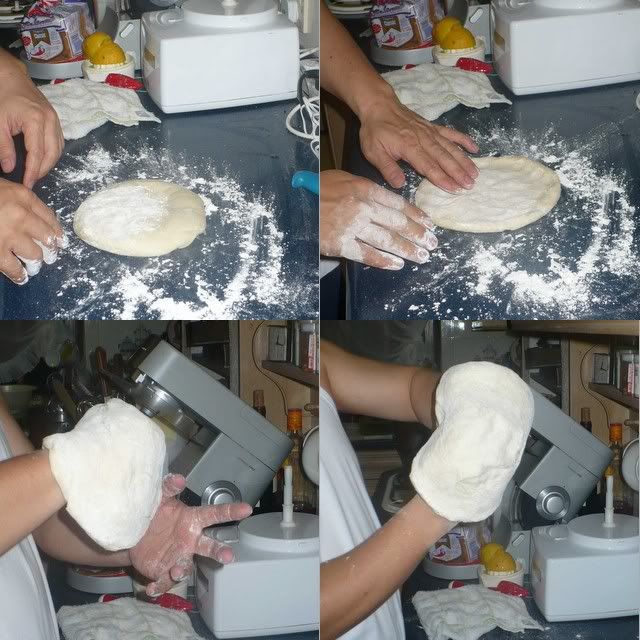
Capturing a piece of flying dough on camera proved to be a harder task than expected, for the wife, who is not camera savvy. So I had to do a demonstration, on how to take the picture, while SHE, tossed the dough like a pizzaiolo. Obviously I won't be asking her to capture any shots of me doing a mid air sommersault from a high diving board.
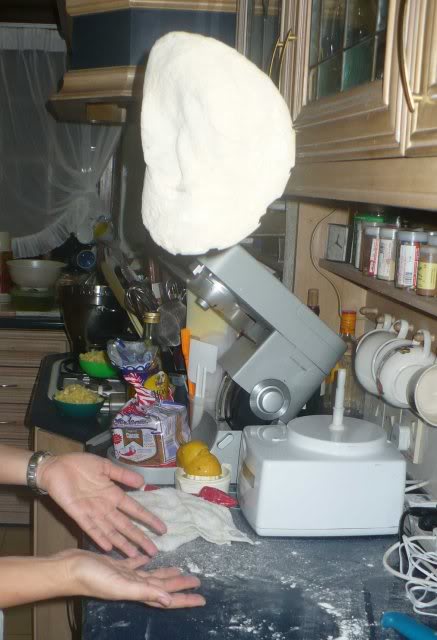
Finally, after like 200 shots, (thank God for digital), I finally managed to get a pic of my dough in the air...
During the tossing process, if the dough tends to stick to your hands, lay it down on the floured counter and reflour your hands, then continue the tossing and shaping.
In case you would be having trouble tossing the dough or if the dough never wants to expand and always springs back, let it rest for approximately 5-20 minutes in order for the gluten to relax fully,then try again.
You can also resort to using a rolling pin, although it isn’t as effective as the toss method.
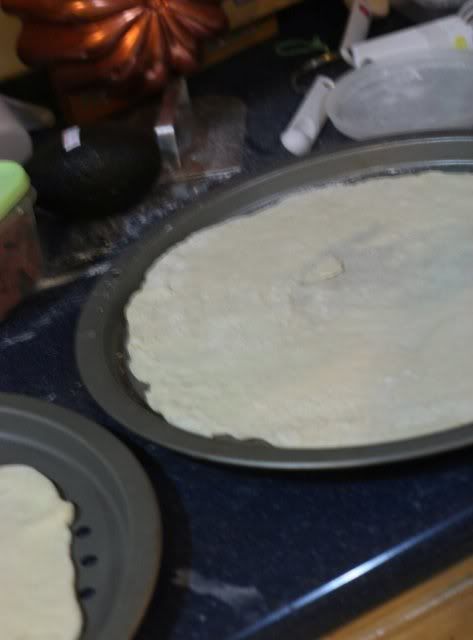
11. When the dough has the shape you want (about 9-12 inches/23-30 cm in diameter - for a 6 ounces/180g piece of dough), place it on the back of the jelly pan, making sure there is enough semolina/durum flour or cornmeal to allow it to slide and not stick to the pan.
12. Lightly (LIGHTLY? WHAT'S THIS? THE LEANING POWER OF PIZZA? Nah, I like heavy fattening toppings) top it with sweet or savory toppings of your choice.
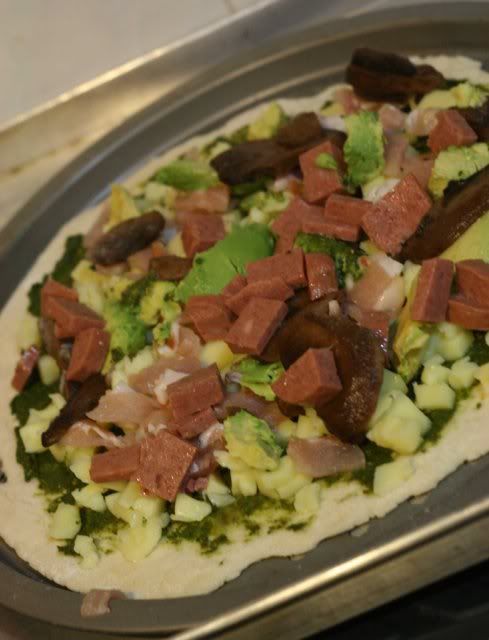
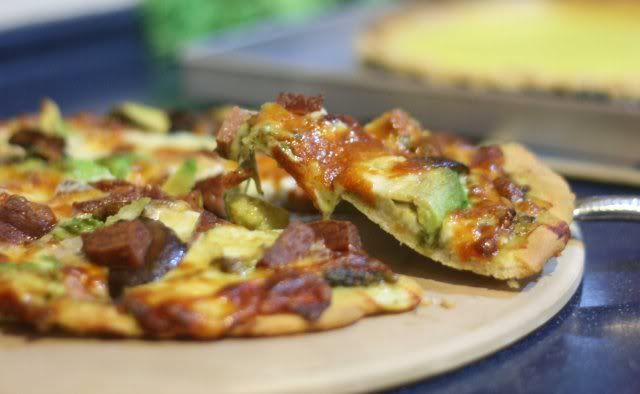
My toppings for the adult pizza were pure basil puree, homemade, plus a little bit of store bought pesto, mozzarella, avocado, luncheon meat, some leftover bacon and mushrooms....
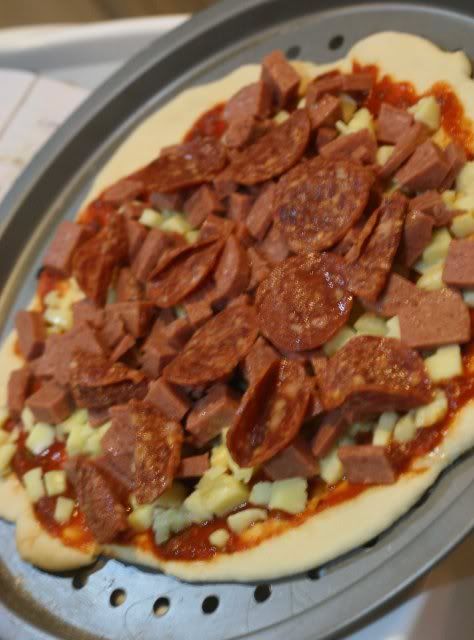
And for the kids, a tomato paste, beef pepperoni, luncheon meat, and lots of mozarella.
NOTE: Remember that the best pizzas are topped not too generously. No more than 3 or 4 toppings (including sauce and cheese) are sufficient. [THIS NOTE WAS IGNORED, LIKE A DO NOT LITTER SIGN IN KUALA LUMPUR STREETS]
13. Slide the garnished pizza onto the stone in the oven or bake directly on the jelly pan. Close the door and bake for abour 5-8 minutes.
14. Take the pizza out of the oven and transfer it to a cutting board or your plate. In order to allow the cheese to set a little, wait 3-5 minutes before slicing or serving.
The dough was nice, but to be honest, a LOT more work than I am used to, compared with my normal pizza dough that takes all of 5 minutes to put together.
Also, the tossing bit, I watched some youtube videos with demos, and it's a tough job. An acquired skill, for sure, much like the juggling of teppenyaki knives and bottles for bartenders.... dexterity and hand eye coordination is a prerequisite, which sadly, I have not.
At the end of the day, everyone enjoyed the pizzas, so it was a worthwhile endeavour. Thanks again Rosa for hosting.
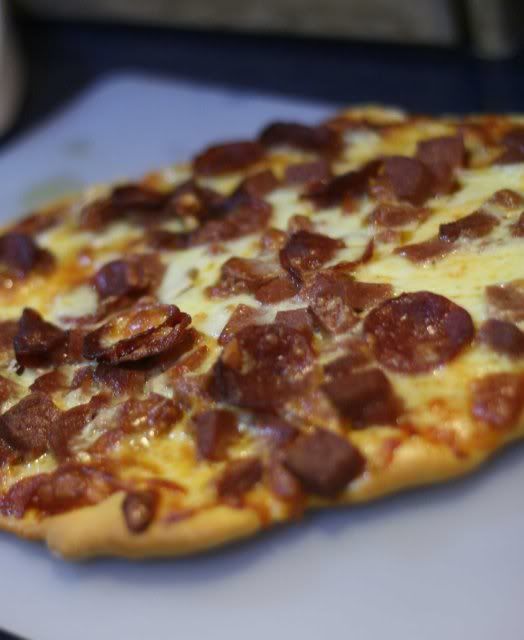
Kids pizza
27 comments:
Your pizzas look yummy. I am with you the more toppings the better!
Wahh.. I thot you were making a stew when I saw your adult topping!!
But the finished product looks great. I like thin crust with slightly burnt edges.
You wearing pagoda ah? Should be making yin-yeung toast and black kopi then instead! :D
BTW, did you get my email on the microplanes ah?
I was looking at a recipe for making roti canai, and the author suggested that we use a wet tea towel to practise flinging the dough. Wonder if that works...
regarding the comment - Obviously I won't be asking her to capture any shots of me doing a mid air sommersault from a high diving board - can you do THAT next puhleese.. ? i am sure everyone is dying to see you sommersault..
wa.. you really whacked the toppings onto that pizza man.. but the finish product looks damn shiok! good one:D
one question.. didja really toss the pizza till it became the size in the final photo? if yes, then.. impressive!
I love your tossing photos! Too funny! Your pizzas look just yummy. I love seeing what evryone put on theirs.
sugared prods, yours look great as well! thanks for dropping by.
ciki, evil arent ya. want to see me in a box izzit? no lah, i cheated a bit. cant toss to save my life.
gfad, for roti canai its not so much a toss as it is a ....err...whats the movement called... coz the dough doesnt actually leave your hands does it? yeap, almost like a pagoda singlet that one. hainanese ma.
ruth, heavy toppings are the way to go!
Ok wert your tossing...So badlah you, Missus took nice pics mar. Get one of the young uns to help take pics lor next time.
Delicious looking pizzas!
Great tossing pictures! Your pizzas look fantastic! Very well done!
Cheers and greeting from Switzerland,
Rosa
Ha! So you DID do the challenge after all.... Well done FBB
Hahaha...I don't think your wifey did a bad job ler...hehe, were you the one with high expectations?:D
I liked that picture of where the pizza was tossed...haha, or rather, the dough:p
And do do, capture the somersault as well;)
cant b that hard rite to take a picture of dough flying in mid air?
then again i havent taken any..except of ppl doing star jumps..i suppose dough fly up and down faster then ppl..
luncheon meat and pizza?? i think you struck treasure with that combo!
Ha ha, I like the pic in which the flying pizza dough looks like it's draped over the microscope (or whatever kitchen aid that is) and the one showing your sexy singlet.
Great job, FBB!
Ooops, I haven't done mine. Other half was on fast and strict diet the past few days for a medical checkup, so I procrastinated till it was too late. Better get off my bum to make the dough now. Can't expect to see it on my blog for a few days yet... sorry!
Ah, yes, the dough tossing was quite a challenge. I also agree with the suggestion to 'lightly top' the pizzas. Are they crazy? A pizza is simply a vehicle to get many tasty toppings into your mouth hole!
good job on the tossing! I agree that the process of making this pizza dough is 23 hours too long for me too. But I am glad that I did it. The thin crust pizzas are worth the wait.
your post got me curious about the origins of pizza lah. i thought it originated from Pisa. acherly, it's naples...hmmmm....
niways, naples or nipples, your topping sizzles. lah...good job there...
Looks like your "more is better" approach paid off. The pizzas look fantastic!
Like Argus, I thought your wife's dough was draped over the kitchenaidlookingthingy. That's the problem with 2-dimensional photos. Your post made me laugh out loud, especially the reference to the KL Do Not Litter Sign. Notice how rubbish is always strewn to the heights of Mt Kinabalu right at the sign?
AWOL, that's a kenwood mixer la. i am so pleased i can manage to make someone laugh out loud...
jacque, thanks for dropping by. nice blog you have there. loved the texas shaped pizza.
hairy berry, as usual, so poetic.
ah, mandy, our monthly meeting! oooh, i love your pizza toppings. lemon asparagus! sounds divine!
bakinoregon, hahah, i love tht description! A pizza is simply a vehicle to get many tasty toppings into your mouth hole!TOO TRUE.
argy, haha, it does look like a microscope hor
nipples, luncheon meat goes great!
christy, haha, somersaults? wanna see me in a box ah?
rosa, thanks for hosting!
dharm, yalar, since i quite new, didnt want to be booted out before even starting.
unka, next time i make for you okay.
Hey, did avocado bake well? One time I tried to cook it, it became a bit bitter or dark, I can't remember which.
I did mine today - tossing is crazy! I cannot catch, ain't no Harlem Globetrotter.
Nice, you made pizza dough the ol' traditional way. Jamie Oliver would have been proud :)
Your pizza looks delectable, btw.
An educational post for me. Didn't realise the dough needs days to prepare. As for the dexterity in tossing, why not ask your kids? ;)
2 days? O_o
Hahaha, if your kids were throw.. i mean tossing it, it would probably landed on the floor.
jason, yalor, 2 days. well, 24 hours to be precise la, but spanning 2 calendar days. yeah, shoulda let the kids try... tummythoz... hahah.
tummythoz, my other recipe takes 10 minutes only... and no tossing.
elaine, haha, yeah, well, i'd rather make nigella lawson proud.
argus, yup, the avocado baked wonderfully! i guess the cheese protected it from oxidising.
My first one was a disaster - Halloween hell pizza! Come n see... ^_^ But it tasted better than the second and third ones. (Maybe I was hungry, and then later full.)
Hah, I so empathise with you on the kneading... My first attempt with a pizza drew rivulets of sweat down my brow. (Thankfully, none contributed to the making of the pizza. Haha.)
And what's this with the sexy singlet, as Argus puts it? Learning a trick or two from The Nigella, ja? :P
I thought you just got to layer your topping nicely on the pizza for the best effect.
argus: you throw, fbb catch
PS: someone please catch a photo of fbb doing the summersault from the diving platform, please.
Looks really good.
BTW, I'm looking hi and low for a rectangle "Baking Stone" in Klang Valley. Do you know where to find it?
Post a Comment